test import

Categories

Ad Home

Responsive Ads Here

Labels

642-813 SWITCH (2) 642-902 ROUTE (2) 643-832 TSHOOT (1) Access Based Enumeration (1) access list (2) AIX (1) Anti Malware (16) AutoIT (1) backtrack (4) Basic Networking (3) Blogspot (2) bootable USB (1) can not download attach file from gmail (1) ccna (9) CCNA Lab (19) centos (3) Check (1) Check_MK (3) cisco (51) Dell (1) DHCP (1) Download (2) Dynamic Host Configuration Protocol (1) ebook (2) Ebooks (18) eigrp (1) encapsulation (3) esxi5 (2) exam (13) exchange server 2010 (3) facebook (2) firewall-cmd (1) firewall-config (1) firewalld (1) Frame Relay (4) Free Router Simulator Softwares (1) FreeNAS (1) GhostSurf (1) gns3 (1) Hacking Security (5) hardware (1) hotspot (1) How to Change Windows 2008 R2 SID (1) How to create VPN network on Linux (1) How to install openSSH on AIX 5.3 (1) How to Install the Microsoft Core Fonts on Fedora 19 (1) HP (1) IBM (1) Infrastructure Monitoring (3) InterVLAN (1) ip routing (3) IPSec (2) ipv6 (1) IT (122) joomla (1) Kiến thức (278) LAN Technology (3) life skills for (1) lifeskills (2) linux (13) Linux-Unix (24) mac address (1) Magazine (9) Mail (2) mail server (1) MCSA (7) Microsoft (28) mikrotik (3) Multipoint (1) Nagios (3) NAT (1) nested (1) Network (1) Network Load Balancing (1) News (1) Nghệ thuật sống (1) O365 (4) Office 365 (4) OSPF (1) Packet tracer (19) Pass4sure (1) Point to Point (1) Point-to-Point Protocol (PPP) – CHAP (1) Point-to-Point Protocol (PPP) – PAP (1) Policy (3) Port Security (1) Practice Labs (19) Prerequisites (1) proxy (1) relax (7) rhel7 (1) RIP (1) routerOS (3) Routing (1) SAN (1) SAN Storage (1) Scripts (6) Server (1) server room (1) Sharepoint Server 2007 (1) Sharepoint Server 2010 (1) Spanning Tree Protocol (1) SSH login without password (1) Static Default Route (1) Storage (1) subnet (1) switch (1) System Requirements for Windows Server 2012 (1) Tản mạn (2) tcp-ip (1) telnet (1) TestInside (1) Thư giãn (4) Thủ thuật (2) tip (3) Tips + Tricks (29) trick (1) Tutorial (29) Tutorialvirtual server HighAvailability (1) ubuntu (4) unix (3) Unix-Linux (8) usb (1) Virtual Private Network (VPN) - IPsec (Site-to-Site) (1) Virtual Trunking Protocol (1) Virtualization (2) Virtualization HighAvailability (1) virus (5) vmware (6) vpn (4) vpn client (1) vpn client to site (2) vpn site to site (2) vSphere 5 (6) vSphere 5.1 (1) WAN Technology (13) Warranty (1) wildcard mask (1) windows 7 (1) windows 8 (1) windows server 2008 (3) Windows Server 8 (1)

Facebook

Ethereum

Subscribe for New Post Notifications

Ripple

Ethereum Price

Monday Tuesday Wednesday
$402.89 $384.06 $396.34

Contact Form

Name

Email *

Message *

Bitcoin

Litecoin

Browsing Category " vpn "

Cấu hình VPN Client To Site trên Mikrotik RouterOS

On IT
Tiếp theo loạt bài về Mikrotik:

CÀI ĐẶT MIKROTIK RouterOS
Thiết lập hệ thống hotspot gatewway sử dụng mikrotik

Trong bài viết này, Tôi sẽ hướng dẫn cấu hình nhanh VPN Client theo giao thức PPTP trên nền Mikrotik.

Lý thuyết về VPN thì các bạn tự tìm hiểu nhé! Tôi không đề cập nữa.

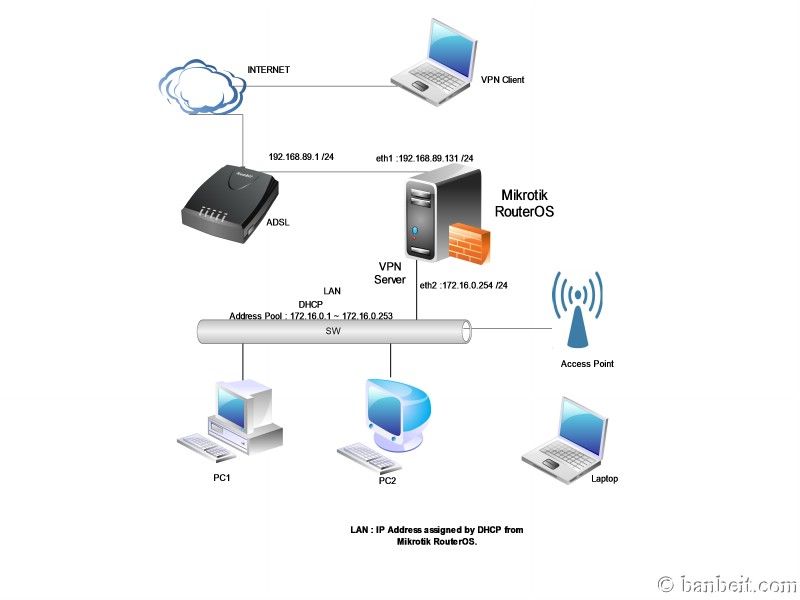
Mô hình bài lab này như sau :


Chúng ta sẽ sử dụng Winbox để cấu hình.

Cấu hình Mikrotik VPN Client To Site tuần tự theo các bước sau:


Cấu hình VPN trên Mikrotik theo giao thức PPTP.

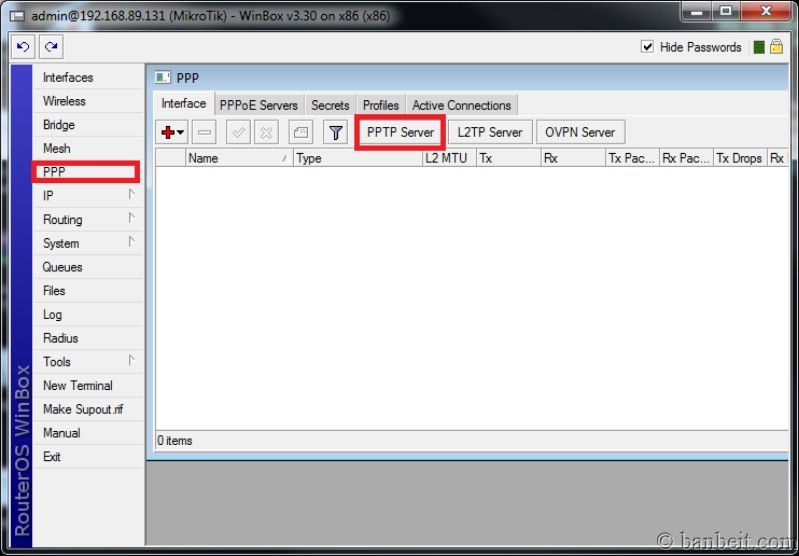
Trên giao diện Winbox, click vào PPP ---> PPTP Server


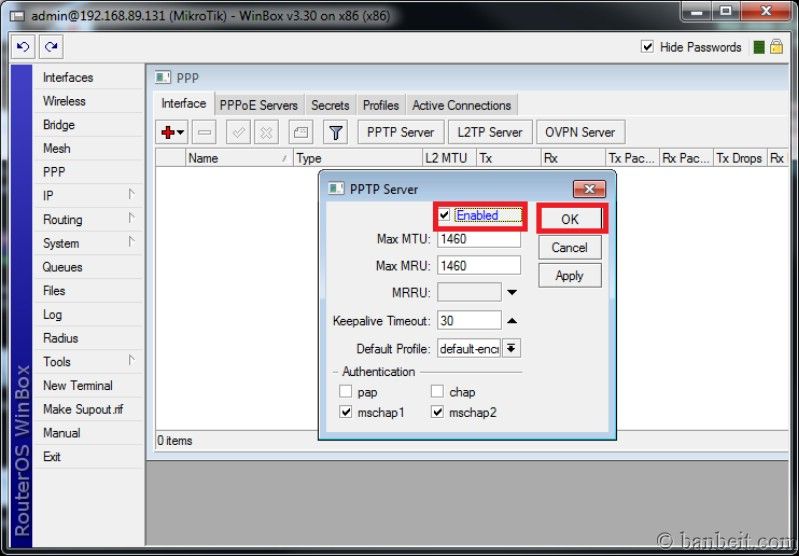
Đánh dấu vào mục Enabled ---> OK


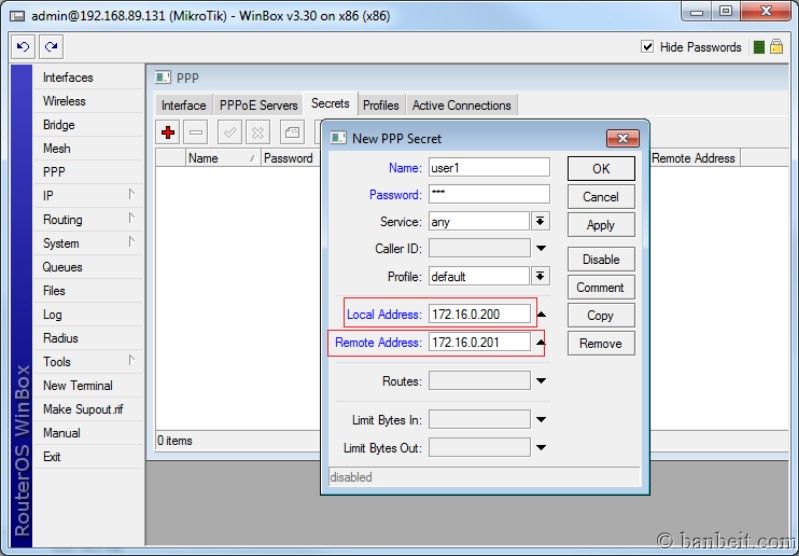
Qua tab Secrects ----> click vào dấu + màu đỏ để tạo user sử dụng VPN


Điền vào tên user , mật khẩu


Điền vào Local Address và Remote Address

Local Address : có thể hiểu như là IP gateway của các user khi kết nối VPN.
Remote Address : IP sẽ cấp cho user khi kết nối VPN.


Sau khi điền xong các thông số trên thì click OK để hoàn tất việc cấu hình VPN Client To Site trên nền Mikrotik.

Việc cấu hình VPN trên Mikrotik RouterOS đã xong.

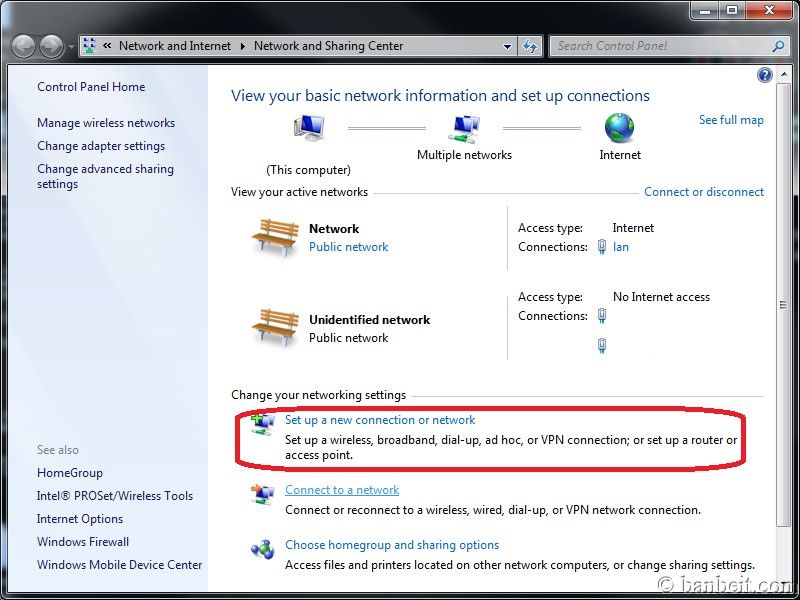
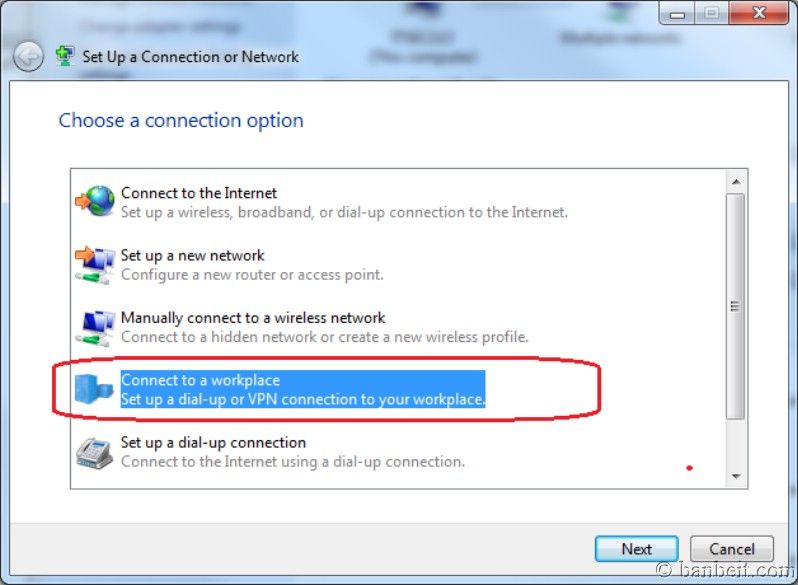
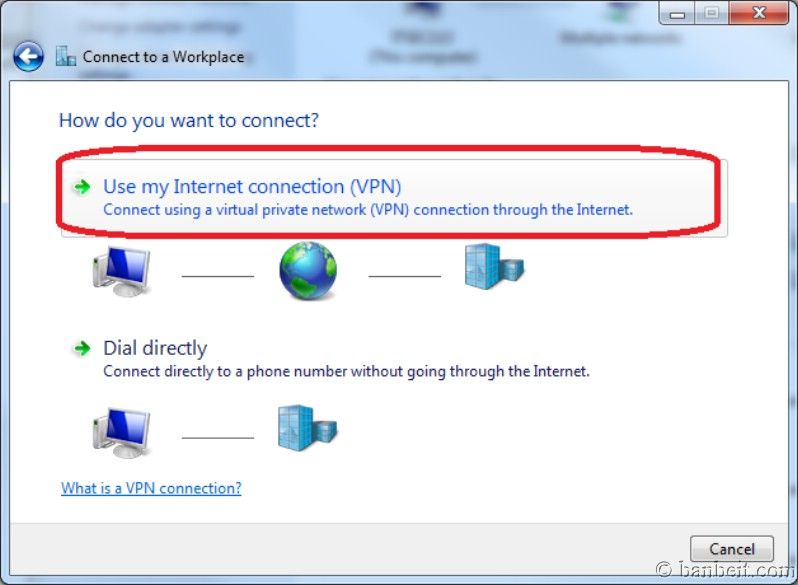
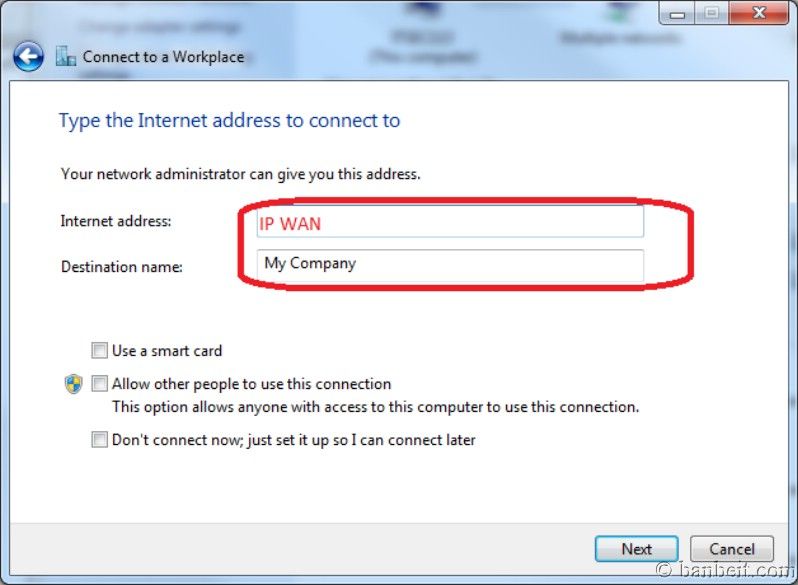
### Tạo kết nối VPN client trên Windows để kiểm tra

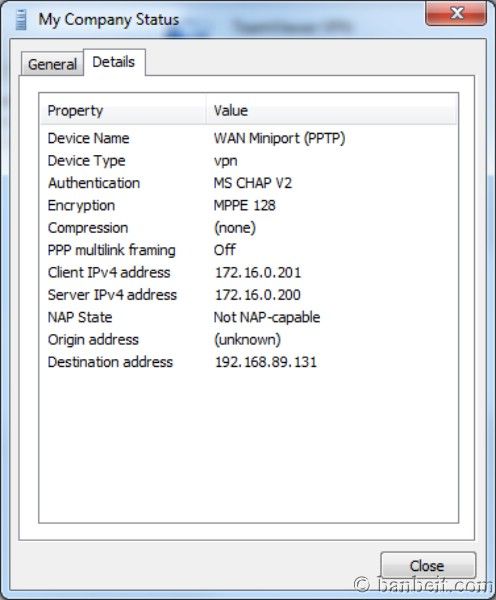
Ở đây, Tôi tạo kết nối VPN trên Windows 7.

Vì trọng tâm của bài lab là cấu hình VPN trên Mikrotik RouterOS nên Tôi chỉ up vài hình ở phần này thôi nhé!


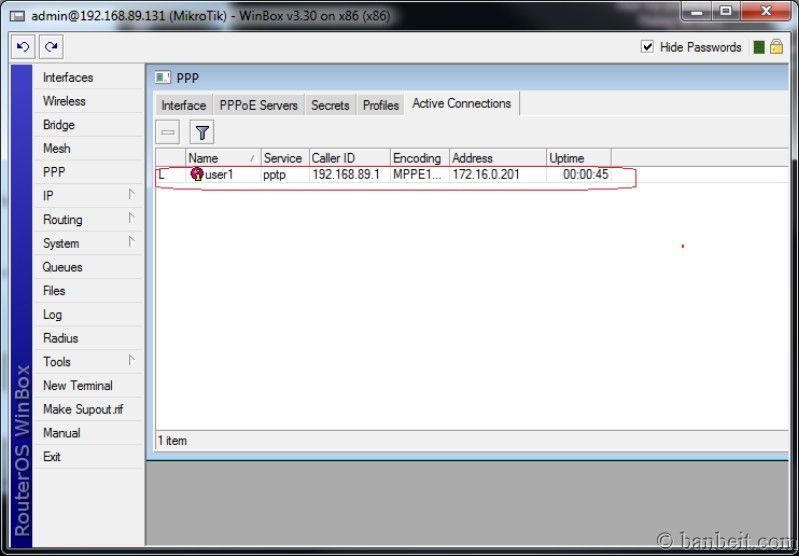
Tại tab Active Connections trên Winbox, Chúng ta sẽ thấy những user nào đang kết nối VPN.


Bài Lab đến đây hoàn tất. Cảm ơn các bạn đã xem.
Copyright by http://www.lecuong.info

How to setup VPN Access on Server 2008

How to setup VPN Access on Server 2008
On IT
In this post I will cover how to setup and configure a Windows 2008 server as a VPN server. There are several different steps and configurations that need to be done. There are 4 parts to this setup that I will walk through.

Part #1 Installing NPAS and RRAS:

Open Server Manager and open roles


Click on add roles and add the Network Policy and Access Services role (NPAS)
Click next on the informational screen
On the role services screen choose Routing and Remote Access Services (RRAS) and click next
On the next screen click install
When it is done it will give you a screen telling you if it installed successfully or failed
If it was successful click close and choose to restart when it prompts you

Part #2 Configure RRAS:

Open Server Manager
Expand the Roles tree
Expand NPAS and right click on RRAS choose configure
OPTION #1 = If you have two network cards choose “Remote access (dial-up or VPN)”
OPTION #2 = If you have one network card choose “Custom configuration”

NOTE: It is recommend to use two network cards
OPTION #1 = Click next and select the VPN box
OPTION #2 = Click next and check the VPN box
On the next screen when prompted click start service and then click finish

Part #3 Configure VPN user group:

Go into your Active Directory and create a group for VPN access. An example name would be MYVPNGROUP.  Add the users to this group that you want to have VPN access to your network.

Part #4 Configure Network Policy Server:

You need to specify a server that will provide access to your network. This is a RADIUS server. For this example I will use the same server for everything.
Go to start>>programs>>administrative tools>>Network Policy Server
Expand RADIUS Clients and Servers
Right click on RADISU Clients and choose new
Fill in all the fields in my screenshot
NOTE: be sure to create a shared secret and write this down somewhere.
Right click on Network Policies and choose new
Click next
On this screen click on “Add”
Select “User Groups” and click add
Once you do this the condition requires the users to be a part of this VPN group before they can connect to VPN.
On the next screen choose “Access granted” and click next
On the Authentication Methods screen I leave the defaults. You can select a different type of authentication according to your needs.
On the Configure Constraints screen select NAS Port Type
I do not configure any of the other options on this screen. You can configure what you need according to your needs.
On Configure Settings screen I leave most of the default settings. I do make sure under IP Settings that the Server settings determine IP address assignment.
Click next and finish
Then you will see your VPN policy on the next screen.
That’s it you should be able to connect to VPN now.


Author: sbuchanan
Copyright by http://www.lecuong.info

THIẾT LẬP MÔ HÌNH VPN (Gateway – Gateway)

On IT

Virtual Private Network (VPN) - Mạng riêng ảo là một công nghệ cho phép mở rộng phạm vi của các mạng LAN (Local Area Networks) mà không cần bất kì đường dây riêng nào.VPN được dùng để kết nối các chi nhánh phân tán về mặt địa lí thành một mạng duy nhất và cho phép sử dụng từ xa các chương trình ứng dụng dựa trên các dịch vụ trong công ty.

- Mô hình bài Lab như sau:

Highslide JS

Chúng ta có 4 máy :
    + Client1 , Server1 đặt tại Hà Nội
    +Client2, Server2 đặt tại Tp.HCM
Quy ước:
+Card Lan: nối giữa các máy trong nội bộ với nhau
+Card INTERNET: nối vào SW để ra internet
- Đặt địa chỉ IP cho các máy như sau:

Client1 : có 1 card mạng

Card LAN:

IP Address : 172.16.1.2

Subnet Mask : 255.255.255.0

Default Gateway : 172.16.1.1

Preferred DNS : để trống

SEVER1: sử dụng 2 card mạng

Card INTERNET:

IP Address : 192.168.1.1

Subnet Mask : 255.255.255.0

Default Gateway : 192.168.1.254

Preferred DNS : 210.245.24.20

Card LAN:

IP Address : 172.16.1.1

Subnet Mask : 255.255.255.0

Default Gateway : để trống

Preferred DNS : để trống

SERVER2:
Card INTERNET :

IP Address : 192.168.2.1

Subnet Mask : 255.255.255.0
Default Gateway : 192.168.2.200
Preferred DNS : 210.245.24.22

Card LAN :
IP Address : 172.16.2.1

Subnet Mask : 255.255.255.0

Default Gateway : để trống
Preferred DNS : để trống


Client2:

Card LAN:

IP Address : 172.16.2.2

Subnet Mask : 255.255.255.0

Default Gateway : 172.16.2.1

Preferred DNS : để trống

-------------------------------------------------------------------------------
Các bước chuẩn bị đã xong, chúng ta bắt đầu thực hiện bài LAB nhé!

I• Cấu hình VPN trên máy server1

- B1: Tạo user account
User name: hanoi
Password: hanoi
Cho phép user hanoi có quyền Allow Access

Highslide JS
- B2: Mở Administrative Tools -> Routing and Remote Access, click chuột phải trên SERVER1 chọn  Configuring and Enable Routing and Remote Access

Highslide JS
- B3:  Cửa sổ Welcome to the Routing and Remote Access Server Setup Wizard--Next--cửa sổ Configuration ---> check vào ô Custom Configuration và Next:

Highslide JS
- B4:  Cửa sổ Custom Configuration và check vào các ô: VPN access, Demand-dial connections (user for branch office routing) và LAN routing --> Next--> Finish ---> Yes

Highslide JS
- B5: Cửa sổ Routing and Remote Access -- click chuột phải trên Network Interface --> chọn New Demand-dial Interface

Highslide JS
- B6:  Cửa sổ Welcome ,click Next ->cửa sổ Interface Name và nhập vào hanoi ---> Next
***lưu ý: Interface name bên này là username bên kia ! ( hồi đi học cũng hay lẫn lộn cái vụ này ! hehe...)

Highslide JS
- B7:  Cửa sổ Connection Type--- chọn Connect using virtual private networking (VPN) --> Next

Highslide JS
- B8:  Cửa sổ VPN Type, chọn Point to Point Tunneling (PPTP) ---> Next

Highslide JS

- B9:  Cửa sổ Destination Address và nhập vào Host name đã đăng ký hoặc gõ vào IP tĩnh (nếu có) ---> Next

Highslide JS
- B10:  Cửa sổ Protocols and Security để mặc định ---> Next

- B11:  Cửa sổ Static Routes for Remote Networks ---> Add


Highslide JS

- B12:  Cửa sổ Static Route và nhập các giá trị như hình -- OK --- Next

Highslide JS

- B13:  Cửa sổ Dial Out Credentials, nhập các thông tin như sau:

• User name : saigon

• Domain : để trống

• Password : saigon

• Confirm password : saigon

và chọn Next --- Finish

Highslide JS

- B14:  Routing and Remote Access ---> click chuột phải trên  SERVER1 -- chọn Properties -- qua tab IP --> chọn Static address pool và Add

Highslide JS
- B15:  Cửa sổ New Address Range và nhập các giá trị như hình vẽ --> OK và chọn OK

Highslide JS

- B16:  Cửa sổ Routing and Remote Access và click chuột phải trên SERVER1 --- All Tasks ---> Restart

Highslide JS

II•Cấu hình VPN trên máy SERVER2

- Lặp lại các bước của phần Cấu hình VPN trên máy SERVER1 cho máy SERVER2, thay đổi các thông tin sau:


- Tại bước 1:

User name : saigon

Password : saigon
Cho phép user saigon có quyền Allow Access

- Tại bước 6 ( khai báo Interface )

Interface name: saigon

- Tại bước 12 (tạo Static Routes ) :

Interface : saigon

Destination : 172.16.1.0

Network mask : 255.255.255.0

Metric : 1

- Tại bước 13 (khai báo Dial Out Credentials ) :

User name : hanoi

Domain : (để trống)

Password : hanoi

Confirm password : hanoi


- Tại bước 14
 ( tạo Static Address Pool ):

Start IP Address : 172.16.2.200

End IP Address : 172.16.2.220


Đến đây mọi việc đã hoàn tất, hiện giờ 2 site Hà Nội và TP.HCM có thể truy xuất dữ liệu lẫn nhau được rồi đấy!
Chúc các bạn thực hiện thành công!!:)


Copyright by http://www.lecuong.info

THIẾT LẬP MÔ HÌNH VPN (Client – Gateway)

On IT

- Mô hình bài Lab như sau:

Highslide JS

**Quy ước:
card LAN: card mạng dùng để nối giữa 2 máy với nhau
card INTERNET: card mạng nối đến switch để các máy đều thấy nhau
và nối vào Router

Client1 : sử dụng 1 card
Card LAN:

IP Address : 172.16.1.2

Subnet Mask : 255.255.0.0

Default Gateway : 172.16.1.1

Preferred DNS : để trống

SERVER1
Card LAN:

IP Address : 172.16.1.1

Subnet Mask : 255.255.0.0

Default Gateway : để trống

Preferred DNS : để trống

Card INTERNET:

IP Address : 192.168.1.1

Subnet Mask : 255.255.255.0

Default Gateway : 192.168.1.254 (trỏ về router )

Preferred DNS : 210.245.24.20

Client2: sử dụng 1 card

Card INTERNET

IP Address : 10.0.0.5

Subnet Mask : 255.255.255.0

Default Gateway : 10.0.0.2
Preferred DNS : 210.245.24.20

Các bước thực hiện

1.NAT port 1723 của Router ADSL về máy SERVER1.
(xem bài “Các NAT port một số modem thông dụng” )

2. Cấu hình VPN Server trên máy SERVER:

Bước 1 : Tạo user để Client2 kết nối vào VPN Server

User: u1
Password: 123

-bỏ dấu chọn tại ô User must change password at next logon.
Cho phép U1 có quyền Allow access --> OK

Highslide JS

B2: Chọn Start -- Programs -- Administrative Tools -- Routing and Remote Access.
Trong cửa sổ Routing and Remote Access, Click chuột phải SERVER1 -- chọn Configure and Enable Routing and Remote Access.

Highslide JS

- B3: Cửa sổ Welcome to the Routing and Remote Access Server Setup Wizard, nhấn Next.Tại cửa sổ Configuration, check vào ô Remote Access (dial-up or VPN) và Next

Highslide JS

- B4: Cửa sổ Remote Access, check vào ô VPN --Next

Highslide JS

- B5: Cửa sổ VPN Connection ,chọn card INTERNET và bỏ dấu chọn tại ô ” Enable security on the selected… packet filters” , nhấn Next .

Highslide JS

- B6: Cửa sổ IP Address Assignment, check vào ô “From a specified range of addresses” nhấn Next

Highslide JS

- B7: Tại cửa sổ Address Range Assignment, chọn New

Highslide JS

- B8:Tại cửa sổ New Address Range, nhập vào Start IP và End IP, nhấn OK -- Next

Highslide JS

- B9:Tại cửa sổ Managing Multiple Remote Access Servers, check vào ô “No, use Routing and … requests”--> Next -- > Finish --->OK

Highslide JS

3.Cấu hình VPN Client trên máy Client2:

-Click chuột phải trên My Network Places chọn Properties --Create a new connection -- cửa sổ Welcome --> Next.
-Tại cửa sổ Network Connection Type --> check vào ô “Connect to the network at my workplace” --->Next

Highslide JS

- Cửa sổ Network Connection, check vào ô “Virtual Private Network Connection” -- Next

Highslide JS

- Tại cửa sổ Connection Name -->tại ô Company Name gõ vào tên bất kỳ (VD:ITLab) –Next.

Highslide JS

-Tại cửa sổ VPN Server Selection, gõ Hostname đã đăng ký trên NO-IP vào ô “Host name or IP address……” --> Next --->Finish

**Lưu ý: Tại SERVER1 bạn phải cài chương trình cập nhật IP cho host name banbeit.no-ip.com !

-Tại cửa sổ Connect, nhập User name là u1, Password là 123 và Connect

Highslide JS

Giờ thì bạn có thể từ bất cứ nơi đâu cũng có thể lấy dữ liệu từ văn phòng c.ty!


Copyright by http://www.lecuong.info