test import

Categories

Ad Home

Responsive Ads Here

Labels

642-813 SWITCH (2) 642-902 ROUTE (2) 643-832 TSHOOT (1) Access Based Enumeration (1) access list (2) AIX (1) Anti Malware (16) AutoIT (1) backtrack (4) Basic Networking (3) Blogspot (2) bootable USB (1) can not download attach file from gmail (1) ccna (9) CCNA Lab (19) centos (3) Check (1) Check_MK (3) cisco (51) Dell (1) DHCP (1) Download (2) Dynamic Host Configuration Protocol (1) ebook (2) Ebooks (18) eigrp (1) encapsulation (3) esxi5 (2) exam (13) exchange server 2010 (3) facebook (2) firewall-cmd (1) firewall-config (1) firewalld (1) Frame Relay (4) Free Router Simulator Softwares (1) FreeNAS (1) GhostSurf (1) gns3 (1) Hacking Security (5) hardware (1) hotspot (1) How to Change Windows 2008 R2 SID (1) How to create VPN network on Linux (1) How to install openSSH on AIX 5.3 (1) How to Install the Microsoft Core Fonts on Fedora 19 (1) HP (1) IBM (1) Infrastructure Monitoring (3) InterVLAN (1) ip routing (3) IPSec (2) ipv6 (1) IT (122) joomla (1) Kiến thức (278) LAN Technology (3) life skills for (1) lifeskills (2) linux (13) Linux-Unix (24) mac address (1) Magazine (9) Mail (2) mail server (1) MCSA (7) Microsoft (28) mikrotik (3) Multipoint (1) Nagios (3) NAT (1) nested (1) Network (1) Network Load Balancing (1) News (1) Nghệ thuật sống (1) O365 (4) Office 365 (4) OSPF (1) Packet tracer (19) Pass4sure (1) Point to Point (1) Point-to-Point Protocol (PPP) – CHAP (1) Point-to-Point Protocol (PPP) – PAP (1) Policy (3) Port Security (1) Practice Labs (19) Prerequisites (1) proxy (1) relax (7) rhel7 (1) RIP (1) routerOS (3) Routing (1) SAN (1) SAN Storage (1) Scripts (6) Server (1) server room (1) Sharepoint Server 2007 (1) Sharepoint Server 2010 (1) Spanning Tree Protocol (1) SSH login without password (1) Static Default Route (1) Storage (1) subnet (1) switch (1) System Requirements for Windows Server 2012 (1) Tản mạn (2) tcp-ip (1) telnet (1) TestInside (1) Thư giãn (4) Thủ thuật (2) tip (3) Tips + Tricks (29) trick (1) Tutorial (29) Tutorialvirtual server HighAvailability (1) ubuntu (4) unix (3) Unix-Linux (8) usb (1) Virtual Private Network (VPN) - IPsec (Site-to-Site) (1) Virtual Trunking Protocol (1) Virtualization (2) Virtualization HighAvailability (1) virus (5) vmware (6) vpn (4) vpn client (1) vpn client to site (2) vpn site to site (2) vSphere 5 (6) vSphere 5.1 (1) WAN Technology (13) Warranty (1) wildcard mask (1) windows 7 (1) windows 8 (1) windows server 2008 (3) Windows Server 8 (1)

Facebook

Ethereum

Subscribe for New Post Notifications

Ripple

Ethereum Price

Monday Tuesday Wednesday
$402.89 $384.06 $396.34

Contact Form

Name

Email *

Message *

Bitcoin

Litecoin

Browsing Category " Linux-Unix "

How to create VPN network on Linux

There are many ways to setup a VPN, for most users security is a concern because the VPN is basically a gateway to your whole home network. In this tutorial I will be using Hamachi for setting up the VPN.
LogMeIn Hamachi is a hosted VPN service that lets you securely extend LAN-like networks to distributed teams, mobile workers and your gamer friends alike. In minutes. More infomation: here
The most difficult thing for most people when setting up a VPN is forwarding a port in their router so that the VPN can actually connect. The port you need to forward is port 1723 and the procedure is probably explained in your router’s manual and won’t be covered here.

Dont worry! You can do this the easy way you can do this the easy way and install the Hamachi VPN for a very easy VPN setup.
This article will help you to add Linux machine to this existing network and communicate other systems ( windows + linux ) on this network.

03 steps to do this.


How to install openssh on AIX

On AIX
How to install SSH on AIX?

There are a lot of sites where the process is explained.
This article is a small doc so that I can remember and hopefully help others as well looking to install openssh on AIX 5.3.

Fortunately, it’s not very difficult to install!

03 steps:


1/Download the openssh and prerequisite openssl packages from their respective websites.

2/ Transfer the installation files to a temporary directory on the AIX server (/tmp)

3/ Unpack and install:

Install openSSL

root@banbeit.com:/tmp/ssh >uncompress openssl.0.9.8.1100.tar.Z
root@banbeit.com:/tmp/ssh >tar xf openssl.0.9.8.1100.tar
root@banbeit.com:/tmp/ssh >cd openssl.base 0.9.8.1100/
root@banbeit.com:/tmp/ssh/openssl.0.9.8.1100 >installp -acXYgd . openssl


Install openssh

root@banbeit.com:/tmp/ssh >uncompress openssh_5.2p1_aix53.tar.Z
root@banbeit.com:/tmp/ssh >tar xf openssh_5.2p1_aix53.tar
root@banbeit.com:/tmp/ssh >cd openssh_5.2p1_aix53
root@banbeit.com:/tmp/ssh/openssh_5.2p1_aix53 >installp -acXYgd . openssh


Once you have installed ssh, you may disable telnet by commenting it out of /etc/inetd.conf and stopping the service:

perl -p -i -e 's/^telnet/\#telnet/g' /etc/inetd.conf
refresh -s inetd

Cài đặt Microsoft Core Fonts trên Fedora 19

Dạo này chuyển qua xài Fedora 19 (XFCE) trên laptop của công ty, vì vậy nên sẵn đó tôi viết vài bài về việc cài đặt những phần mềm cần thiết cho hệ điều hành này trong quá trình sử dụng phục vụ công việc.

Trong bài viết này, tôi sẽ hướng dẫn cài đặt Microsoft TrueType Core Fonts (Arial, Tahoma...) trên Fedora 19 ( các distro khác cài tương tự.)

Mở ternimal, chuyển qua quyền root:

[lecuong@ITDept.vlotte]# su -i

Có 2 cách cài Microsoft fonts:

Cài đặt Skype 4.2 trên Fedora 19

On IT
Trong bài viết này, tôi sẽ hướng dẫn cài đặt Skype 4.2 trên fedora 19. Các distro khác tương tự.

1.Chuyển sang quyền root


su -


2. Cài đặt thêm các gói cần thiết


$ yum install alsa-lib.i686 fontconfig.i686 freetype.i686 glib2.i686 libSM.i686 libXScrnSaver.i686 libXi.i686 libXrandr.i686 libXrender.i686 libXv.i686 libstdc++.i686 pulseaudio-libs.i686 qt.i686 qt-x11.i686 zlib.i686 qtwebkit.i686

3. Tải về gói Skype 4.2 Dynamic


$ cd /tmp
$ wget --trust-server-names http://www.skype.com/go/getskype-linux-dynamic

4. Tiến hành cài đặt Skype

Hướng dẫn tạo ảnh ổ đĩa với Ubuntu Live CD

Việc sao lưu ổ cứng là rất hữu hiệu, nhưng nếu bạn muốn tạo nhiều bản sao lưu hoặc đơn giản chỉ cần backup đầy đủ? Khái niệm ảnh – image của ổ đĩa cứng ra đời, cho phép người sử dụng thực hiện nhiều thao tác vô cùng tiện lợi. Trong bài viết sau, Quản Trị Mạng sẽ giới thiệu với các bạn công cụ hữu ích dd trong đĩa Ubuntu Live CD để làm việc này.
Việc tạo file ảnh của ổ đĩa cứng khá đơn giản,
ngoại trừ việc sao lưu dữ liệu từ 1 ổ cứng này sang ổ khác, ở đây chúng ta sẽ “hô biến” toàn bộ dữ liệu của ổ cứng thành 1 file duy nhất. Và tất nhiên dung lượng của file ảnh này sẽ rất lớn, phụ thuộc vào toàn bộ dữ liệu trên ổ cứng. Tiện ích dd sẽ sao lưu toàn bộ dữ liệu, kể cả file rác trên đó. Vì vậy bạn cần chuẩn bị thiết bị lưu trữ có dung lượng đủ lớn để chứa file sao lưu.
Lưu ý: việc sử dụng dd cần hết sức cẩn thận, vì nếu không dd sẽ xóa toàn bộ dữ liệu trên ổ cứng mà không có cách nào phục hồi lại được.
Tạo file ảnh của ổ đĩa cứng
Khởi động hệ thống từ đĩa Ubuntu Live CD, chọn phân vùng nơi chúng ta sẽ lưu file ảnh của ổ đĩa. Nhấn menu Places và chọn nơi để lưu, ở ví dụ này là phân vùng 136GB:
Tiếp theo, mở ứng dụng Terminal (Applications > Accessories > Terminal) và di chuyển tới phân vùng mới. Tất cả các phân vùng nhận diện đều ở trong mục /media, vì vậy chúng ta dùng lệnh:
cd /media
và gõ 1 vài ký tự đầu tiên của ổ đĩa (sau đó nhấn tab để tự hiển thị đầy đủ) và di chuyển đến thư mục đó:
Bước tiếp theo là xác định ổ đĩa mà bạn muốn tạo ảnh, trong cửa sổ Terminal gõ câu lệnh sau:
sudo fdisk -l
Bạn sẽ thấy có 1 phân vùng 1 Gb là /dev/sda, và chúng ta sẽ tạo ảnh của phân vùng đó. Dùng lệnh sau:
sudo dd if=/dev/sda of=./OldHD.img
Cú pháp trên có nghĩa chúng ta sao lưu dữ liệu từ đầu vào (“if”) /dev/sda thành file sản phẩm (“of”) OldHD.img.
Quá trình này sẽ diễn ra trong khoảng thời gian khá ngắn. Tiếp theo, chúng ta cần kiểm tra xem file ảnh đó có hoạt động hay không.
Kiểm tra file ảnh
1 tiện ích khác nữa của dd là khả năng xóa bỏ toàn bộ dữ liệu trên phân vùng ổ cứng. Sử dụng câu lệnh sau:
sudo dd if=/dev/urandom of=/dev/sda
Quá trình này cần 1 số dữ liệu đầu vào ngẫu nhiên, và kết quả là phân vùng ổ cứng /dev/sda:
Nếu ta kiểm tra ổ đĩa bằng lệnh sudo fdisk –l, thì phân vùng đó đã được xóa bỏ hoàn toàn:
Khôi phục ổ đĩa từ file ảnh
Chúng ta có thể khôi phục tình trạng của ổ đĩa từ file ảnh với câu lệnh dd theo cách tương tự như khi tạo file ảnh đó. Nhưng phải đảo ngược 2 giá trị dữ liệu đầu vào và đầu ra:
sudo dd if=./OldHD.img of=/dev/sda
Khi kết thúc quá trình, chúng ta lại sử dụng sudo fdisk –l để kiểm tra tình trạng phân vùng ổ đĩa:
Chúc các bạn thành công!
T.Anh (theo HowToGeek)

Ebook Hướng dẫn sử dụng Ubuntu 7.1 toàn tập

Ebook Hướng dẫn sử dụng Ubuntu 7.1 toàn tập
On Ebooks


Link Mediafire:   Download

Giáo trình Linux

On Ebooks


Nội dung:
Chương 1: Giới thiệu tổng quan Linux
Chương 2: Hướng dẫn cài đặt Linux
Chương 3: Các phần mềm thông dụng trên Linux
Chương 4: Giao diện đồ họa X-Window
Chương 5: Tập tin, cấu trúc cây thư mục, người dùng
Chương 6: Lệnh tiện ích và quản lý tiến trình

Chương 7 : Trình soạn thảo VI
Chương 8 : Shells và Shell Scripts
Chương 9 : Thiết lập hạ tầng mạng cơ sở
Chương 10 : Domain Name System (DNS)
Chương 11 : Apache
Những điều cần biết về Linux
Thủ thuật trong Linux
Phần bài tập trả lời hỏi đáp về Linux
Phần bài tập trắc nghiệm: Gồm 40 câu trắc nghiệm giúp cho người sử dụng kiểm tra lại kiến thức.

Dung lượng file ISO 438 MB, mình chia làm 4 part:

Part1
Part2
Part3
Part4 


Pw: www.lecuong.info

Chúc các bạn mau chóng thành thạo chú chim cánh cụt.

Ubuntu Linux enable telnet service


          Telnet is an insecure service. It is recommended that you use ssh service. However sometime telnet server or service is needed. Here are instructions to enable telnet:

Install telnetd server

sudo apt-get install telnetd
Restart inetd service:
sudo /etc/init.d/openbsd-inetd restart

Basic vi Commands


 What is vi?

The default editor that comes with the UNIX operating system is called vi (visual editor). [Alternate editors for UNIX environments include pico and emacs, a product of GNU.]
The UNIX vi editor is a full screen editor and has two modes of operation:
  1. Command mode commands which cause action to be taken on the file, and
  2. Insert mode in which entered text is inserted into the file.
In the command mode, every character typed is a command that does something to the text file being edited; a character typed in the command mode may even cause the vi editor to enter the insert mode. In the insert mode, every character typed is added to the text in the file; pressing the (Escape) key turns off the Insert mode.
While there are a number of vi commands, just a handful of these is usually sufficient for beginning vi users. To assist such users, this Web page contains a sampling of basic vi commands. The most basic and useful commands are marked with an asterisk (* or star) in the tables below. With practice, these commands should become automatic.
NOTE: Both UNIX and vi are case-sensitive. Be sure not to use a capital letter in place of a lowercase letter; the results will not be what you expect.


To Get Into and Out Of vi


To Start vi

To use vi on a file, type in vi filename. If the file named filename exists, then the first page (or screen) of the file will be displayed; if the file does not exist, then an empty file and screen are created into which you may enter text.


* vi filename edit filename starting at line 1
  vi -r filename recover filename that was being edited when system crashed


To Exit vi


Usually the new or modified file is saved when you leave vi. However, it is also possible to quit vi without saving the file.
Note: The cursor moves to bottom of screen whenever a colon (:) is typed. This type of command is completed by hitting the (or ) key.


* :x quit vi, writing out modified file to file named in original invocation
  :wq quit vi, writing out modified file to file named in original invocation
  :q quit (or exit) vi
* :q! quit vi even though latest changes have not been saved for this vi call


Moving the Cursor

Unlike many of the PC and MacIntosh editors, the mouse does not move the cursor within the vi editor screen (or window). You must use the the key commands listed below. On some UNIX platforms, the arrow keys may be used as well; however, since vi was designed with the Qwerty keyboard (containing no arrow keys) in mind, the arrow keys sometimes produce strange effects in vi and should be avoided.
If you go back and forth between a PC environment and a UNIX environment, you may find that this dissimilarity in methods for cursor movement is the most frustrating difference between the two.
In the table below, the symbol ^ before a letter means that the key should be held down while the letter key is pressed.


* j or
  [or down-arrow]
move cursor down one line
* k [or up-arrow] move cursor up one line
* h or
  [or left-arrow]
move cursor left one character
* l or
  [or right-arrow]
move cursor right one character
* 0 (zero) move cursor to start of current line (the one with the cursor)
* $ move cursor to end of current line
  w move cursor to beginning of next word
  b move cursor back to beginning of preceding word
  :0or 1G move cursor to first line in file
  :nor nG move cursor to line n
  :$or G move cursor to last line in file


Screen Manipulation

The following commands allow the vi editor screen (or window) to move up or down several lines and to be refreshed.


  ^f move forward one screen
  ^b move backward one screen
  ^d move down (forward) one half screen
  ^u move up (back) one half screen
  ^l redraws the screen
  ^r redraws the screen, removing deleted lines


Adding, Changing, and Deleting Text

Unlike PC editors, you cannot replace or delete text by highlighting it with the mouse. Instead use the commands in the following tables.
Perhaps the most important command is the one that allows you to back up and undo your last action. Unfortunately, this command acts like a toggle, undoing and redoing your most recent action. You cannot go back more than one step.


* u UNDO WHATEVER YOU JUST DID; a simple toggle


The main purpose of an editor is to create, add, or modify text for a file.

Inserting or Adding Text

The following commands allow you to insert and add text. Each of these commands puts the vi editor into insert mode; thus, the key must be pressed to terminate the entry of text and to put the vi editor back into command mode.


* i insert text before cursor, until hit
  I insert text at beginning of current line, until hit
* a append text after cursor, until hit
  A append text to end of current line, until hit
* o open and put text in a new line below current line, until hit
* O open and put text in a new line above current line, until hit


Changing Text

The following commands allow you to modify text.


* r replace single character under cursor (no needed)
  R replace characters, starting with current cursor position, until hit
  cw change the current word with new text,
starting with the character under cursor, until hit
  cNw change N words beginning with character under cursor, until hit;
  e.g., c5w changes 5 words
  C change (replace) the characters in the current line, until hit
  cc change (replace) the entire current line, stopping when is hit
  Ncc or cNc change (replace) the next N lines, starting with the current line,
stopping when is hit


Deleting Text

The following commands allow you to delete text.


* x delete single character under cursor
  Nx delete N characters, starting with character under cursor
  dw delete the single word beginning with character under cursor
  dNw delete N words beginning with character under cursor;
  e.g., d5w deletes 5 words
  D delete the remainder of the line, starting with current cursor position
* dd delete entire current line
  Ndd or dNd delete N lines, beginning with the current line;
  e.g., 5dd deletes 5 lines


Cutting and Pasting Text

The following commands allow you to copy and paste text.


  yy copy (yank, cut) the current line into the buffer
  Nyy or yNy copy (yank, cut) the next N lines, including the current line, into the buffer
  p put (paste) the line(s) in the buffer into the text after the current line


Other Commands


Searching Text

A common occurrence in text editing is to replace one word or phase by another. To locate instances of particular sets of characters (or strings), use the following commands.


  /string search forward for occurrence of string in text
  ?string search backward for occurrence of string in text
  n move to next occurrence of search string
  N move to next occurrence of search string in opposite direction


Determining Line Numbers

Being able to determine the line number of the current line or the total number of lines in the file being edited is sometimes useful.


  :.= returns line number of current line at bottom of screen
  := returns the total number of lines at bottom of screen
  ^g provides the current line number, along with the total number of lines,
in the file at the bottom of the screen


Saving and Reading Files

These commands permit you to input and output files other than the named file with which you are currently working.


  :r filename read file named filename and insert after current line
(the line with cursor)
  :w write current contents to file named in original vi call
  :w newfile write current contents to a new file named newfile
  :12,35w smallfile write the contents of the lines numbered 12 through 35 to a new file named smallfile
  :w! prevfile write current contents over a pre-existing file named prevfile


                                                                                         From:   http://www.cs.colostate.edu

How to Set a Static IP address in Ubuntu


There seems to be a known bug with the Gnome Network Manager included with the Ubuntu 8.10 release that resets any static ip address settings that are set manually when the system is rebooted reverting back to a DHCP setup. These steps will remove the Gnome Network Manager and help you manually setup the required files for your static network configuration.


Solution 1
Step 1 – Remove the Gnome Network Manager: You need to complete this step first because if left installed this application will overwrite any changes you make to your configuration when the system is rebooted. This is apparently where the bug is located.
To remove the Gnome Network Manager issue the following command in the terminal:
sudo update-rc.d -f NetworkManager remove
This will disable and remove the Gnome Network Manager application. Now you will have to edit your configuration manually.
Restart your System
Step 2
Manual configuration of your network interface: In this step you will manually configure your network interface by editing the following two files using your preferred text editor(nano gedit vi). For the purpose of this example I am using the nano editor.
Step 2.1 – Manually configure your network interface file: You can edit the appropriate file by entering the following command into the terminal:
sudo nano /etc/network/interfaces
Once your prefered editor opens the file you want to enter the following information (changing your addresses where necessary):
auto lo eth0
iface lo inet loopback
iface eth0 inet static
address xxx.xxx.xxx.xxx(enter your ip here)
netmask xxx.xxx.xxx.xxx
gateway xxx.xxx.xxx.xxx(enter gateway ip here)
Be sure to save your changes.
Step 2.2 – Manually configure your dns configuration file: You can edit the appropriate file by entering the following command into the terminal:
sudo nano /etc/resolv.conf
Once your preferred editor opens the file you want to enter the following information (changing your addresses where necessary):
# Generated by NetworkManager
nameserver xxx.xxx.xxx.xxx(enter your dns server ip)
nameserver xxx.xxx.xxx.xxx(enter your alt dns server ip)
Be sure to save your changes.
Step 2.3 – Manually restart your network interface with the new settings: Enter the following command in the terminal:
sudo /etc/init.d/networking restart
This should return a result that looks like the following:
*Reconfiguring network interfaces… [OK]
At this point in your terminal you should be able to run the ifconfig command and the results should reflect your new settings. If the addressing is correct you should have full network access, even after a system restart.
Haven’t tried reinstalling the Network Manger after doing these steps to see if it still works.
Solution 2
Install Wicd if you need both wired and wireless connection
Solution 3
Also, it is said that adding a new config in networkmanager (instead of editing the system default ‘Auto eth0′ stuff) and assign the right MAC address (and the static ip) will fix it, every thing’s fine even after reboot, and you can still use that gnome-networkmanager.
Check this simple guide
Credit Goes here

                                                                                                         Soure: ubuntugeek

Phòng chống ddos bằng mod_evasive

mod_evasive là một module của apache cho phép chúng ta hạn chế các cuộc tấn công bằng ddos.mod_evasive sẽ hạn chế số kết nối của một clients trong một thời gian nhất định, bằng cách đó có thể chống lại được các cuộc tấn công ddos.

Sau đây tôi xin hướng dẫn cách cài đặt mod_evasive cho apache 2.

Ở tại command line gõ các lệnh sau:

cd /usr/local/src


wget http://www.zdziarski.com/projects/mod_evasive/mod_evasive_1.10.1.tar.gz


tar -xf mod_evasive_1.10.1.tar.gz


cd mod_evasive


Tại thời điểm này, phiên bản mới nhất là 1.10, các bạn có thể vào http://www.zdziarski.com/p... để cập nhật phiên bản cho nó.

Tiếp tục đánh lệnh sau:

apxs -cia mod_evasive20.c


Nếu xuất hiện lỗi như sau -bash: apxs: command not found thì do các bạn chưa cài apxs

yum install httpd-devel


-Sau đó thêm dòng sau vào file cấu hình apache:

DOSHashTableSize 3097
DOSPageCount 6
DOSSiteCount 100
DOSPageInterval 2
DOSSiteInterval 2
DOSBlockingPeriod 600


-Việc cuối cùng chỉ là khởi động lại apache:

/etc/init.d/httpd restart


Giải thích ý nghĩa các tham số:

    * DOSHashTableSize: là độ lớn của bản ghi để lưu trữ thông tin.
    * DOSPageCount: là số lần mà một client request trên cùng một trang, và ip của client này sẽ bị ban khi số lượng request trong một thời gian là DOSPageInterval vượt quá quy định.
    * DOSSiteCount: là số lần mà client request trên website của bạn, và ip của client sẽ bị ban khi số lượng request vượt quá trong một thời gian là DOSSiteInterval.
    * DOSBlockingPeriod là thời gian mà client vi phạm bị ban và được tính bằng giây.

   Ngoài ra còn có các tham số khác như là DOSEmailNotify, DOSLogDir, DOSWhitelist.....các bạn có thể tìm hiểu thêm.


(Sưu tầm)

Cài đặt các phần mềm mới nhất thông qua lệnh YUM

Yum là công cụ cài đặt thông dụng trong CentOS. Ưu điểm nổi bật của Yum là tính tự động cao.
Việc cài đặt thông qua công cụ quản lý gói (YUM) rất dễ sử dụng. Tuy nhiên, tùy theo nguồn nên các phần mềm cài đặt dùng lệnh yum thường không phải là phiên bản mới nhất. Nếu các bạn muốn có các phần mềm mới nhất, mà không cần download source code rồi biên dịch thì có thể làm theo hướng dẫn sau để cập nhật thêm các nguồn tài nguyên cho lệnh yum. cool

Bước 1:
Mở file  /etc/yum.repos.d/CentOS-Base.repo và chèn đoạn text sau vào cuối dòng:

[utterramblings]
    name=Jason’s Utter Ramblings Repo
    baseurl=http://www.jasonlitka.com/media/EL$releasever/$basearch/
    enabled=1
    gpgcheck=1
    gpgkey=http://www.jasonlitka.com/media/RPM-GPG-KEY-jlitka

    [dag]
    name=Dag RPM Repository for Red Hat Enterprise Linux
    baseurl=http://apt.sw.be/redhat/el$releasever/en/$basearch/dag
    gpgcheck=1
    enabled=1


Lưu lại. grin

Bước 2:Nhập khóa GPG để xác thực

[root@lecuong.local ~]# rpm –import http://dag.wieers.com/rpm/packages/RPM-GPG-KEY.dag.txt

[root@lecuong.local ~]# rpm –import http://www.jasonlitka.com/media/RPM-GPG-KEY-jlitka


Thực hiện nâng cấp tất cả các gói phần mềm:
[root@lecuong.local ~]#  yum update


Thế là xong! từ nay các bạn sẽ có các phần mềm mới nhất khi cài đặt từ lệnh yum. cool

Một số lệnh cơ bản sử dụng YUM

YUM là một lệnh thường dùng trong Centos để cài đặt, gỡ bỏ, update....các phần mềm. Đây là một lệnh rất hữu ích và tiện dụng! cool

Hôm nay mình sẽ liệt kê một số option cơ bản của lệnh yum này nhé! smoke

Tìm một phần mềm nào đó:

#yum search package-name
VD: #yum search java

Liệt kê tất cả các gói phần mềm đã được cài đặt trên máy:

# rpm -qa
# yum list installed

Hiển thị danh sách các gói phần mềm đã có bản update:
# yum list updates

Thực hiện nâng cấp tất cả các gói phần mềm:

# yum update


Liệt kê các gói phần mềm với bộ lọc: (vd: samba)
# rpm -qa | grep samba*
# yum list installed samba

Kiểm tra xem một gói phần mềm cụ thể đã có bản update mới chưa:
# yum update package-name

VD: # yum update samba

Tìm kiếm một gói phần mềm lọc theo tên:
# yum list package-name
# yum list regex

VD: samba, có thể dùng dấu * để thay thế cho các kí tự chưa xác định
# yum list samba
# yum list java*

Cài đặt gói phần mềm cụ thể:
# yum install package-name-1 package-name-2
# yum install samba vnc-viewer

Gỡ bỏ gói phần mềm cụ thể:
# yum remove package-name-1 package-name-2
# yum remove samba  vnc-viewer

Hiển thị danh sách các gói đang kích hoạt:
# yum list all

Hiển thị các gói phần mềm theo nhóm:
# yum grouplist

Cài đặt tất cả các gói phần mềm có trong nhóm:
# yum groupinstall "Development Tools"

Update tất cả các gói phần mềm có trong nhóm:
# yum groupupdate "Development Tools"

Gỡ bỏ tất cả các gói phần mềm có trong nhóm:
# yum groupremove "Development Tools"


Hiển thị các gói phần mềm ko thể cài đặt:
# yum list extras

Hiển thị thông tin về gói phần mềm của một file cụ thể:
# yum whatprovides /etc/passwd

Xem trợ giúp thêm về lệnh Yum:
# man yum

How to enable telnet server on Centos 5

TELNET (TELetype NETwork) is a network protocol used on the Internet or local area network LAN connections.

Telnetd is normally invoked by the internet server inetd or xinetd for requests to connect to the telnet port as indicated by the /etc/services file. Usaually telnet listen on port TCP port 23.

Telnet in is insecure protocol and it is recommended that you use ssh server. But some time you really need telnet then first install telnet server as according to version of Linux distribution.

Telnet server installation:

[root@lecuong ~]# yum install telnet-server

Configure telnet server:


The configuration file for telnet is /etc/xinetd.d/telnet. To enable telnet server you need to open this file and make sure disable = no read as disable = yes.

[root@lecuong ~]# vi /etc/xinetd.d/telnet

Alternately:

[root@lecuong ~]# chkconfig telnet on

To start telnet server type command:

[root@lecuong ~]# /etc/init.d/xinetd restart


Finish !!

Build Files server on CentOS

Build File server to share files between Windows computer and Linux Server computer.

1. Install Samba

[root@lecuong.info ~]#  yum -y install samba

2.Configure Samba :  Create a shared directory that anybody can read and write,

a.No Authentication

[root@lecuong.info ~]# mkdir /mnt/D/share

[root@lecuong.info ~]# chmod 777 /mnt/D/share

[root@lecuong.info ~]# vi /etc/samba/smb.conf


unix charset = UTF-8 // add the line

workgroup = WORKGROUP //(Windows' default)

security = share

hosts allow = 127. 192.168.1. //change IP address you permit


// add these lines

[share] // change to any name you like

path = /mnt/D/share // shared directory

writable = yes

guest ok = yes

guest only = yes

create mode = 0777 // fully accessed

directory mode = 0777 // fully accessed

share modes = yes


[root@lecuong.info ~]# /etc/rc.d/init.d/smb start

Starting SMB services:[ OK ]

Starting NMB services:[ OK ]

[root@lecuong.info ~]# chkconfig smb on


Now, you can access to shared directory name "share" on CentOS server.

b.Requires user authentication.

[root@lecuong.info ~]# groupadd banbeit

[root@lecuong.info ~]#  mkdir /home/security

[root@lecuong.info ~]#  chgrp banbeit /home/security

[root@lecuong.info ~]# chmod 0770 /home/security

[root@lecuong.info ~]#  vi /etc/samba/smb.conf


security = user

[Security] // change to any name you like

path = /home/security
writable = yes
create mode = 0770
directory mode = 0770
share modes = yes
guest ok = no
valid users = @banbeit // allow only banbeit group


[root@lecuong.info ~]#  /etc/rc.d/init.d/smb restart

Shutting down SMB services:[ OK ]

Shutting down NMB services:[ OK ]

Starting SMB services:[ OK ]

Starting NMB services:[ OK ]


Add your existing users to samba or create new users and then add them to samba.

[root@lecuong.info ~]#  smbpasswd -a MrCuong    // add an existing user in Samba

New SMB password:                              // set password

Retype new SMB password:                    // verify

Now, you can access to shared directory name "security" on CentOS server with username & password.cool


Orther:Configure Samba from Web browser

1.Install and config xinetd:


[root@lecuong.info ~]# yum -y install xinetd

[root@lecuong.info ~]# /etc/rc.d/init.d/xinetd start

Starting xinetd: [ OK ]

[root@lecuong.info ~]# chkconfig xinetd on

2.Install SWAT

[root@lecuong.info ~]# yum -y install samba-swat

[root@lecuong.info ~]# vi /etc/xinetd.d/swat


only_from = 127.0.0.1 192.168.1.2/24 // add IPs you permit

disable = no


[root@lecuong.info ~]# /etc/rc.d/init.d/xinetd restart

Stopping xinetd: [ OK ]

Starting xinetd: [ OK ]


Now. you can access to http://your-hostname:901, login with user name and password for root, then you can configure samba on browser.cool

Have a nice day for all member of www.lecuong.info and visitor !! coffee

How to Mount NTFS on Centos

Thực ra việc mount NTFS trên Centos rất đơn giản, nhưng đã có nhiều bạn hỏi nên hôm nay tôi sẽ hướng dẫn cụ thể để các bạn mới tiếp xúc với "chú chim cánh cụt" cũng có thể làm được  một cách dễ dàng

Các bạn làm như sau:

B1:Cài đặt ntfs-3g và các thành phần cần thiết
-Cài đặt thêm gói rpmforge để update cho lệnh Yum: Download

-Tiến hành cài đặt gói .rpm vừa tải về, sau đó gõ lệnh sau để cho phép repo:

[root@lecuong.info ~]# yum --enablerepo=rpmforge install fuse fuse-ntfs-3g dkms dkms-fuse

-Cài đặt fuse-ntfs-3g và các tiện ích:


[root@lecuong.info ~]# yum install fuse fuse-ntfs-3g dkms dkms-fuse

B2: Tiến hành mount các ổ đĩa:

-Tạo sẵn các thư mục để mount ổ đĩa. Ở đây tôi có 3 ổ C, D, E (bên Windows ) nên tôi tạo sẵn 2 thư mục này:
[root@lecuong.info ~]# mkdir /mnt/C
[root@lecuong.info ~]# mkdir /mnt/D
[root@lecuong.info ~]# mkdir /mnt/E


-Xem thứ tự các ổ đĩa bạn cần mount:

[root@lecuong.info ~]# fdisk -l

Kết quả trên máy tôi như sau:

Disk /dev/sda: 160.0 GB, 160000000000 bytes
255 heads, 63 sectors/track, 19452 cylinders
Units = cylinders of 16065 * 512 = 8225280 bytes

   Device Boot      Start         End      Blocks   Id  System
/dev/sda1   *           1        5099    40957686    7  HPFS/NTFS
/dev/sda2            5100       14660    76798732+   7  HPFS/NTFS
/dev/sda3           14661       17210    20482843+   7  HPFS/NTFS
/dev/sda4           17211       19452    18008865    f  W95 Ext'd (LBA)
/dev/sda5           17211       17472     2104483+  82  Linux swap / Solaris
/dev/sda6           17473       19452    15904318+  83  Linux


-Mount ổ đĩa:

[root@lecuong.info ~]# mount -t ntfs-3g /dev/sda1 /mnt/C -o force
[root@lecuong.info ~]# mount -t ntfs-3g /dev/sda2 /mnt/D -o force
[root@lecuong.info ~]# mount -t ntfs-3g /dev/sda3 /mnt/E -o force


Để cho các ổ đĩa tự động mount trong quá trình khởi động bạn phải edit file /etc/fstab thêm các dòng sau :

/dev/sda1 /mnt/C ntfs-3g rw,umask=0000,defaults 0 0
/dev/sda2 /mnt/D ntfs-3g rw,umask=0000,defaults 0 0
/dev/sda3 /mnt/E ntfs-3g rw,umask=0000,defaults 0 0


Chúc các bạn thành công!

p/s: Thời gian này busy quá nên ko cật nhật web thường xuyên được, rất mong anh em thông cảm.

BackTrack4 Beta

BackTrack4 Beta


The Remote Exploit Development Team has just announced BackTrack 4 Beta. BackTrack is a Linux based LiveCD intended for security testing and we’ve been watching the project since the very early days. They say this new beta is both stable and usable. They’ve moved towards behaving like an actual distribution: it’s based on Debian core, they use Ubuntu software, and they’re running their own BackTrack repositories for future updates. There are a lot of new features, but the one we’re most interested in is the built in Pico card support. You can use the FPGAs to generate rainbow tables and do lookups for things like WPA, GSM, and Bluetooth cracking.


Trích dẫn

* Default password to BackTrack 4 hasn't changed, still root / toor.

* KDE 3 is being used in BT4. We tried KDE 4, really, we did. It ****ed. Maybe 4.2 in BT4 final.


* Most of the KDE "apt gettable" packages have "kde3" appended to their names. So "apt-get install kate-kde3" is good, "apt-get install kate" is bad. Use "apt-cache search " to search for packages to install.

* Kernel sources included in /usr/src/linux.

* DHCP disabled by default on boot, you need to /etc/init.d/networking start

* If you do an HD install and want to restore networking (DHCP) to be enabled at boot, type "update-rc.d networking defaults".

* VMware users - to fix the KDE resolution, type "fixvmware" before starting X.
* Vmware tools and kernel modules compile perfectly on VMWare 6.5.1

* If you can't get X to work, first try to autogenerate an xorg.conf by typing "Xorg -configure" and try using the generated conf file. If that bums out, you can revert to VESA by typing "fixvesa".

* Wireless networking in KDE can be started with KnetworkManager (/etc/init.d/NetworkManager)

* Various drivers can be found in /opt/drivers (various madwifi branches, video drivers for Nvidia and HP 2133's).

* Installation of BT4 to HD is similar to BT3. (tip - dont forget to modify /etc/fstab after the install. Change the first line from aufs / aufs .... to the corresponding device and filesystem. For example, on my box it's /dev/sda3 / reiserfs defaults 0 0, as my root partition is on sda3 and i used the resiserfs filesystem).

* The warning message "W: GPG error: http://ppa.launchpad.net intrepid Release: The following signatures couldn't be verified because the public key is not available: NO_PUBKEY CB2F6C86F77B1CA9" when "apt-get update" occurs as the Intrepid KDE 3 repos do not use a GPG key. We will eventually host these package in our own repo.


* Conky takes a while to load.


------------------------------------------------------------------
File ISO để burn ra CD
Download

File dành cho Vmware
Download

BackTrack - HĐH dành cho các Hacker

Trong quá trình lang thang trên các diễn đàn quản trị mạng, tôi nghĩ có lẽ các bạn có nghe nói đến HĐH BackTrack.
BackTrack là một distro Linux chạy live CD (chạy trên đĩa, ko cần cài đặt)  về bảo mật rất hay.
Backtrack được tổng hợp rất nhiều công cụ kiểm tra xâm nhập phổ biến và nổi tiếng trên thế giới, được đánh giá là Live CD về bảo mật hay nhất năm 2006 (#1 Security Live Distribution) được tổ chức bởi insecure.org.
Backtrack đã có lịch sử phát triển khá lâu qua nhiều bản linux khác nhau. Phiên bản hiện nay sử dụng bản phân phối Slackware linux (Tomas M. (www.slax.org)). Backtrack liên tục cập nhật các công cụ, drivers,... hiện tại Backtrack có trên 300 công cụ phục vụ cho việc nghiên cứu bảo mật. Backtrack là sự kết hợp giữa 2 bộ công cụ kiểm thử bảo mật rất nổi tiếng là Whax và Auditor.
Phiên bản hiện tại của Backtrack là phiên bản Final 3
http://www.remote-exploit.org/backtrack_download.htm
Phiên bản này cập nhật rất nhiều công cụ "test"  mạng wifi grin


Bạn có thể dùng live CD hay cài vào ổ cứng, ổ USB để tiện sử dụng.
Một vài demo với backtrack 3 có thể tham khảo qua vieo của Josh:
http://www.offensive-security.com/movies/bt3teaser/bt3teaser.html

Thông tin về các  khóa học để sử dụng BackTrack, tham khảo tại http://www.offensive-security.com

Bí kíp võ công để sử dụng Backtrack, các bạn có thể download tại đây:
Offensive Security 101

Part1
Part2
Part3
Part4


Install Backtrack 3 Final to HDD

Cài đặt Backtrack 3 Final lên ổ cứng
Hiện tại trên mạng có rất nhiều tài liệu hướng dẫn cài Backtrack lên HDD nhưng theo tôi ko trực quan và….ko dễ làm! Các bài viết hướng dẫn đều yêu cầu phải boot từ CD Backtrack ( download file ISO về rồi Burn ra đĩa CD!! ).
Vậy đối với những bạn không có ổ ghi thì sao nhỉ? ( như tôi thì ổ ghi bị hư từ lâu rồi!hehe… )-> ko có ổ ghi để ghi Backtrack ra CD --> khỏi cài đặt!shuai
grin Tôi muốn cài Backtrack nhưng ko có CD thì phải làm sao? Sử dụng USB.zan
Ở bài viết trước, tôi đã hướng dẫn cài đặt Backtrack 3 Final lên USB, giờ chúng ta sẽ tiến hành boot từ USB để cài đặt Backtrack lên ổ cứng, chạy song song với Windows ( hoặc Ubuntu hoặc bất cứ HĐH nào!)
1.Chuẩn bị:
a.Phân vùng ổ cứng:
- Phân vùng lại ổ cứng : dùng PQMagic để phân vùng ổ cứng để không mất mát dữ kiệu. Bạn cần tạo thêm 2 phân vùng như sau:
•  một phân vùng 512MB (nhiều hơn tùy bạn) để định dạng là LinuxSwap
•  một phân vùng khoảng 5G (tuỳ bạn) để định dạng Linux ext3 để cài Backtrack3.

-> Khuyến cáo :Không nên dùng Ext2 để cài Backtrack vì nó sẽ check disk mỗi khi khởi động.
Lưu ý :Các bạn có thể dùng fdisk ngay trong đĩa Backtrack và qtparted để phân vùng.Ở đây chúng ta dung PQMagic để bảo đảm không mất dữ liệu.

b.Khởi động Backtrack3 Final từ USB ( thay cho CD vì ko có CD! Hehe….)
- Vào BIO cho phép khởi động từ USB
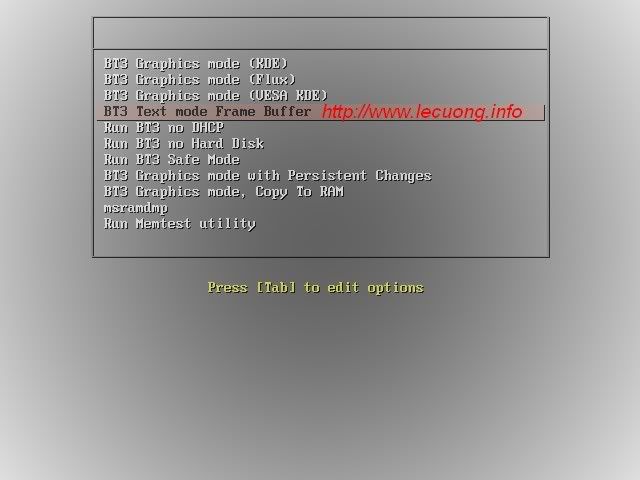
Chọn BT3 Text mode Frame Buffer khi khởi động   ---> mục đích là để gõ user+password chứng thực --> có đầy đủ quyền thao tác trên tài nguyên hệ thống! ( mặc định BT3 sẽ tự động login vào mà ko hỏi user+pass --> cài đặt thường bị lỗi)

Highslide JS

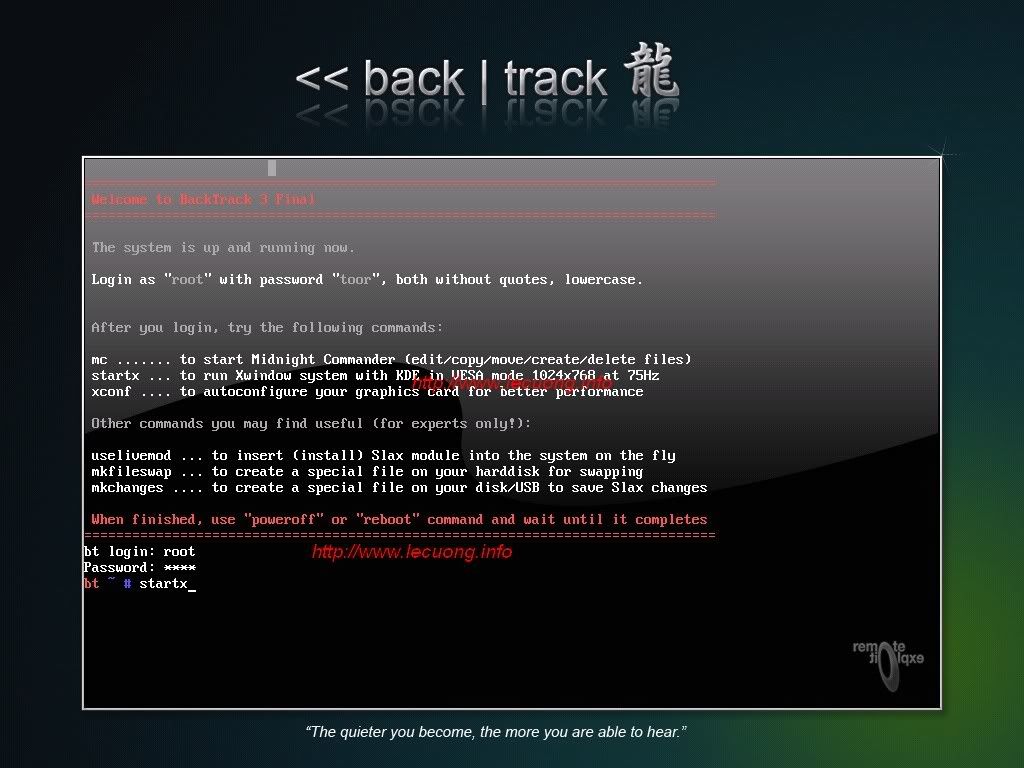
user :root   password :toor
sau khi login gõ : startx  để vào giao diện đồ họa.

Highslide JS

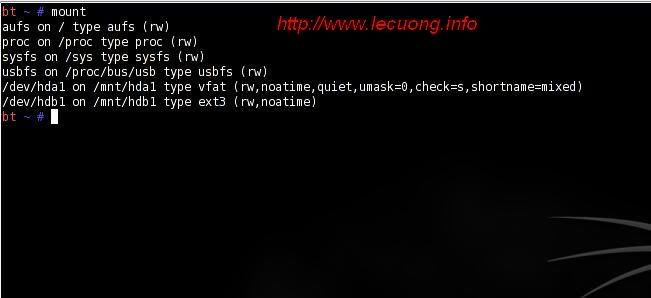
-Mở Konsole gõ lệnh mount để kiểm tra các phân vùng:

Highslide JS

Ta thấy phân vùng /dev/hdb1 được mount vào /mnt/hdb1 có định dạng ext3, chính là phân vùng cần cài Backtrack.
Tùy loại ổ đĩa mà ổ vật lý có tên là /dev/sda hay /dev/hda , thường ổ IDE,SATA sẽ là /dev/hda.

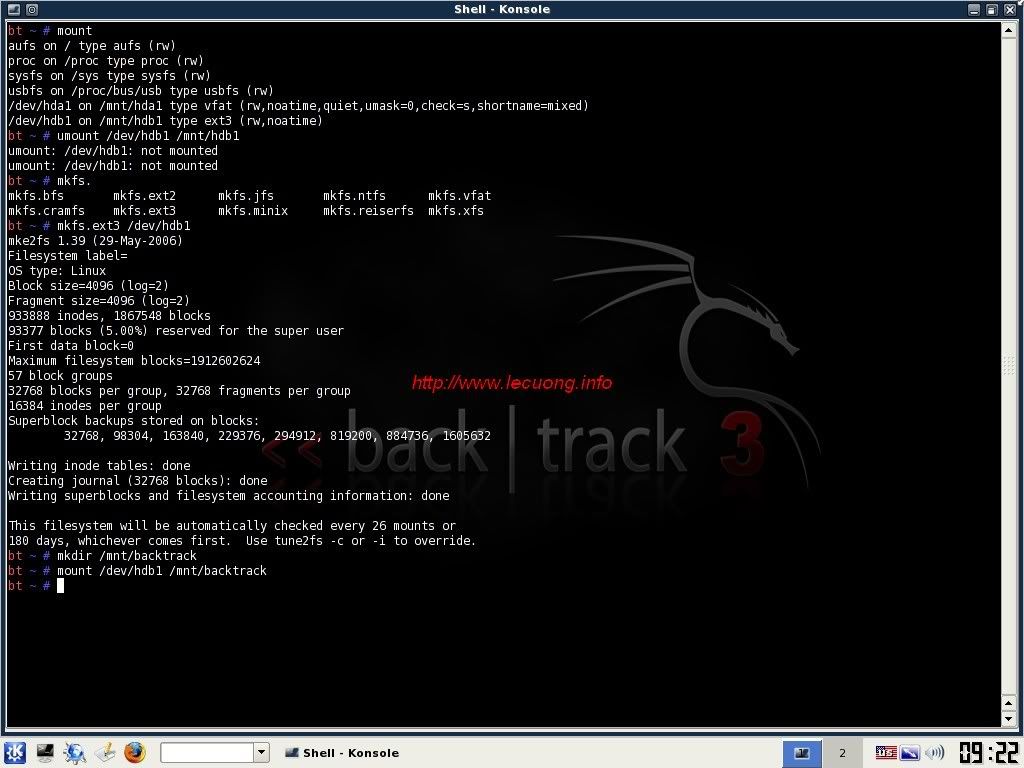
-Format lại ổ /dev/hdb1
mkfs.ext3 /dev/hdb1 để format.

Highslide JS

-Tao thư mục backtrack trong /mnt
mkdir /mnt/backtrack
-Gắn ổ đĩa /dev/hdb1 vào thư mục /mnt/backtrack bằng lệnh:
mount /dev/hdb1 /mnt/backtrack

Highslide JS

2.Cài đặt Backtrack 3 Final lên ổ cứng

a/ Download the BackTrack Installer.

b.Right click vào BT3.kmdr  -->open with  -->Komander Executor

Highslide JS

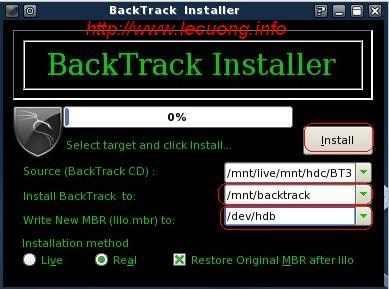
-Chế độ cài Live thì chỉ cần dung lượng ổ cứng tối thiểu là khoảng 800MB.
-Chế độ cài  Real thì ổ cứng tối thiểu là 2.8GB.
Vì ổ cứng đã có hệ điều hành khác nên bạn phải check ô "Restore Original MBR after lilo". Nếu không thì Backtrack sẽ ghi đè lên master boot sector của ổ cứng, khi đó lilo (trình quản lý boot của Backtrack) sẽ được kích hoạt và chạy trước. Nếu làm như vậy bạn cần chỉnh sửa cho lilo để có thể chạy được windows.
Ở đây, chúng check vào ô “Restore Original MBR after lilo" , chọn ổ đĩa cài Backtrack…---> click Install, chờ chương trình chạy 100% --> Close.

Trong Backtrack, file quản lý của backtrack là  lilo.mbr .Trong Windows chương trình quản lý boot là Loading, có file config là boot.ini.

Bây giờ để có thể chạy Backtrack3 Final song song với Windows thì bạn cần:
•  Copy file lilo.mbr ra thư mục gốc của ổ cứng chứa file boot.ini, như của tôi là ở ổ c:\
•  Thêm vào file boot.ini dòng : c:\lilo.mbr="Backtrack 3 Final"
Lưu file boot.ini lại 

Khởi động lại máy tính và hưởng thụ thành quả! Hehe….

Install Backtrack 3 Final to USB

Cài đặt HĐH Backtrack3 Final lên USB!

Ở bài viết trước, tôi đã giới thiệu về Backtrack & các tài liệu để sử dụng.
Trong bài này, tôi sẽ hướng dẫn các bạn cài Backtrack lên USB để có thể sử dụng "mọi lúc, mọi nơi" grin
Highslide JS

Yêu cầu :

    #  USB 1GB hoặc cao hơn
    # File ISO Backtrack 3 Final
   # HĐH Windows ( cái này thì chắc ai cũng có! hamarneh )
   # Máy tính có hỗ trợ Boot từ USB ( để test chơi đó mà! hehe...)

Cài đặt Backtrack 3 Final từ Windows:
1.Download "HP USB Disk Storage format tool" -->format USB theo định dạng FAT32. (ko cần check vào ô Create a Dos startup disk)
2.Download the (Portable Backtrack) USB BackTrack (Extended) version.
3.Giải nén thư mục Boot và BT3 từ file vừa tải về vào  USB.
4.Vào thư mục Boot ( trong USB) ,click bootinst.bat (click continue if the following error appears
5.Làm theo hướng dẫn trong cửa sổ dos  vừa hiện ra để cài chế độ Boot cho USB.
6.Khởi động lại máy tính, chỉnh boot từ USB và....hưởng thụ thành quả!cool

Lưu ý: Mặc định Backtrack sẽ tự động đăng nhập với :
User: root       Password: toor